

Good golf simulator wall padding is cut to your room, not bought in a box. Every bay has a different width, ceiling height, screen position and door or window to work around. Off-the-shelf kits leave gaps exactly where a mishit lands, or they overlap and bunch up.
This guide walks through how we take a padding request from first measurement to a finished quote. You will see the same six steps we use on every job, along with two real projects (names removed): a compact DIY enclosure and a full room build.
By the end you will know what to measure, how pad zones are chosen, how zones become panel sizes, and what a clear quote should include.
Step 1: Measure the room and the screen
A padding quote starts with a handful of measurements in inches. Here is what we ask for:
| Measurement | Why it matters |
|---|---|
| Room width, wall to wall | Sets how wide the screen wall and ceiling coverage run |
| Ceiling height | Sets side wall pad height and how high the screen wall columns go |
| Screen size and how far it hangs off the wall | Defines the gap behind the screen that needs a guard |
| How far back from the screen you want side coverage | Usually 8 ft, which covers the zone where mishits hit |
| Hitting position (distance from screen) | Shows where ceiling pads matter most |
| Doors, windows, outlets, beams, soffits | Each one becomes a notch or a gap in the layout |
| Screen housing or roll size, if retractable | The roll gets its own guard so a ball can't damage it |
If you already have a frame or enclosure, send its inside dimensions instead (width x height x depth). A photo of each wall and a rough sketch save a round of questions.
Step 2: Decide the pad zones
We split the bay into zones based on where a ball can actually go. Not every room needs every zone.
- Side walls. These run from the screen wall back toward the hitter, usually 8 ft. They catch shanks and heavy hooks or slices.
- Screen wall (beside and above the screen). Narrow columns fill the space between the screen edge and the side walls, so a ball that misses the screen never hits drywall.
- Ceiling. Pads go above the screen and out toward the hitter, where flop shots, skied drives and the club's backswing reach.
- Roll guard. For a retractable screen, a pad drops in front of the screen housing to protect the roll.
- Notches. Any outlet, door frame or soffit gets a cutout so the panel still sits flat.
A DIY enclosure is simpler: two side walls and a top, all the same depth as the frame. A full room adds the screen wall columns, ceiling rows and roll guard.
Step 3: Turn zones into panel sizes
Each zone gets divided into panels that tile it with no gaps. We keep every panel at 66 in or shorter on its long side so it ships safely and one person can handle it. Then we pick panel sizes that divide the zone evenly, so seams line up and you never end up with a thin sliver.
Example A: DIY enclosure (96 x 144 x 36 in)
The customer had a frame 96 in tall, 144 in wide and 36 in deep and wanted the two sides and the top covered. One panel size, 24 x 36 x 2 in, divides every surface evenly.
| Zone | Surface | Panels | Math |
|---|---|---|---|
| Left side wall | 36 x 96 in | 4 | 96 / 24 = 4 |
| Right side wall | 36 x 96 in | 4 | 96 / 24 = 4 |
| Top | 144 x 36 in | 6 | 144 / 24 = 6 |
| Total | 84 sq ft | 14 |
One size across the whole job keeps it simple to install and quick to produce.
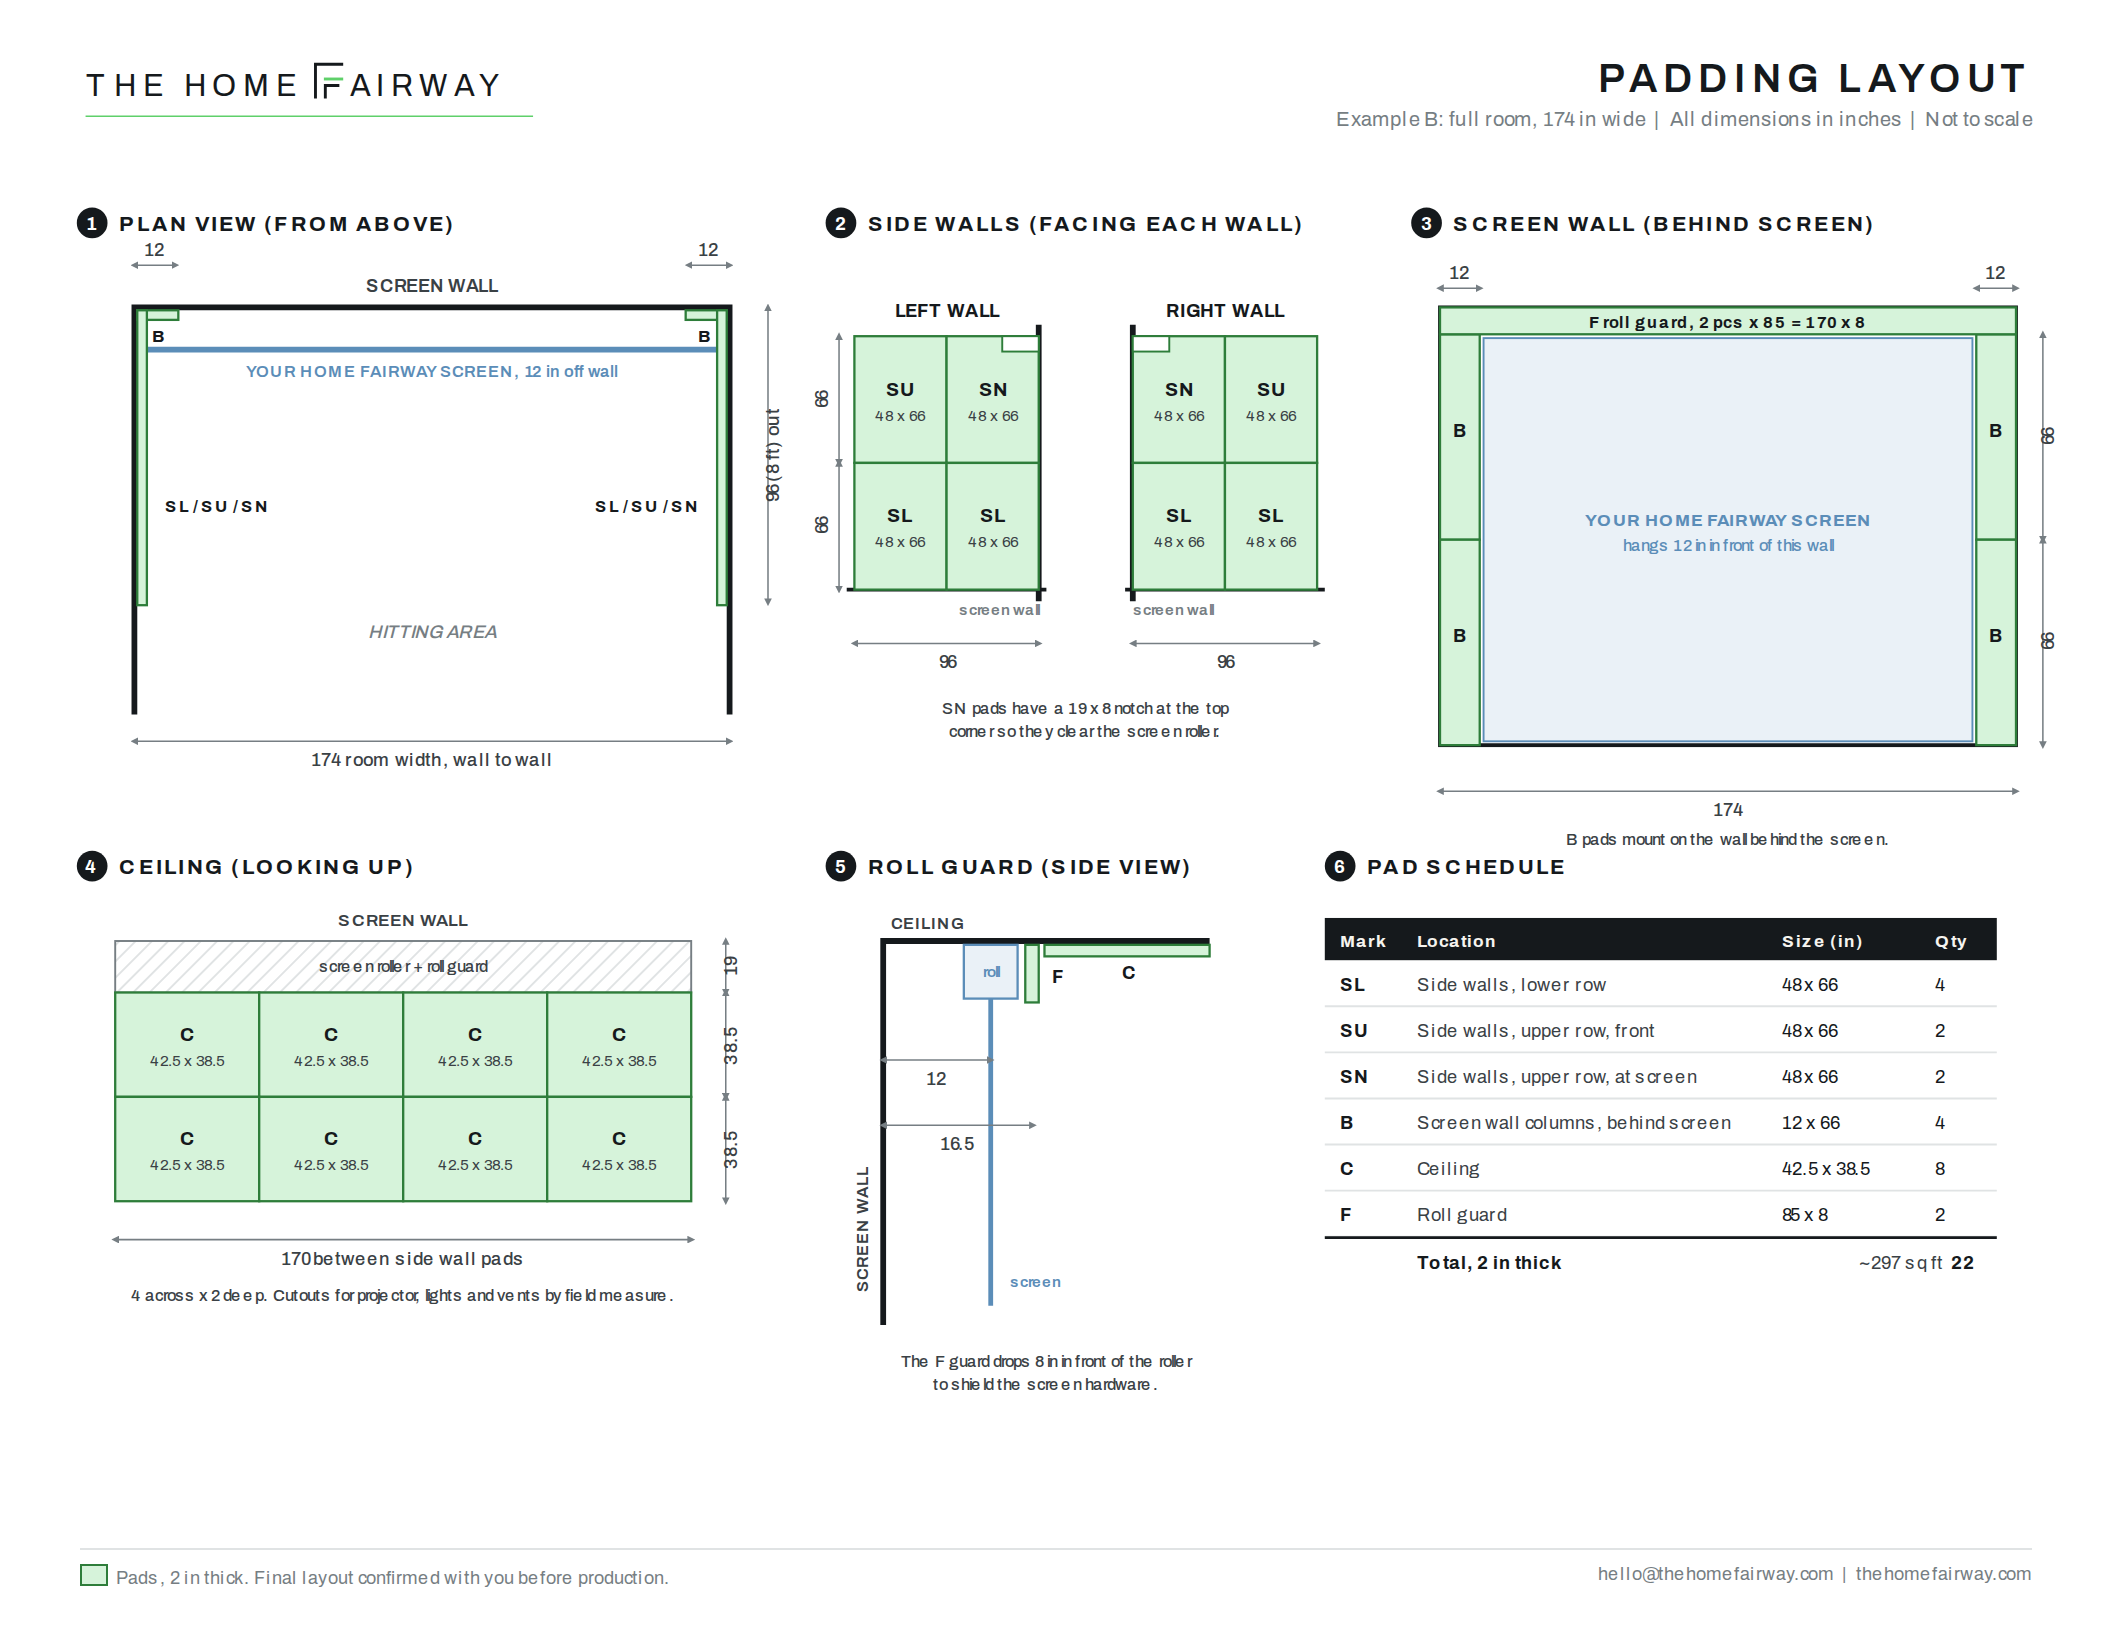
Example B: Full room (174 in wide, 132 in ceiling)
This room had a retractable screen hanging 12 in off the wall, side coverage running 96 in out from the screen wall, and a ceiling of 132 in. It needed every zone from Step 2.
| Zone | Panel | Size (in) | Qty | How we got there |
|---|---|---|---|---|
| Side walls, lower | SL | 48 x 66 | 4 | 96 in run / 2 = 48 wide; 132 in ceiling / 2 = 66 tall |
| Side walls, upper | SU | 48 x 66 | 2 | Same grid, upper course |
| Side walls, upper, notched | SN | 48 x 66, 19 x 8 notch | 2 | Notch clears the screen roller where it meets the side wall |
| Screen wall columns | B | 12 x 66 | 4 | 2 stacked each side of the screen, full 132 in height |
| Ceiling | C | 42.5 x 38.5 | 8 | 4 across x 2 deep, starting 19 in from the screen wall |
| Roll guard | F | 85 x 8 | 2 | Two pieces end to end across the screen housing, 16.5 in off the wall |
| Total | 22 | About 297 sq ft |
The notch is the detail most kits miss. Without it, the upper side panel would hit the screen roller and either bow out or leave a gap at the corner.
Step 4: The dimension drawing and panel schedule
Every full-room quote comes with a one-page padding layout so you can see exactly where each panel goes before you pay. The drawing has five views:
- Plan view from above, showing the screen wall, side wall runs and hitting area.
- Side walls, laid flat, with each panel labeled and the notch called out.
- Screen wall, showing the screen opening, the B columns on each side and the roll guard.
- Ceiling, showing the C grid and its 19 in offset from the screen wall.
- Roll guard section, a side cut showing the 16.5 in offset and 8 in drop.
A panel schedule sits under the views: label, size, quantity and location. Each panel has its own letter code, so you always know which piece goes where.
For a simple enclosure like Example A, the layout table on the quote itself does the same job.
Step 5: The quote
Once the layout is set, we build a one-page quote. Lead time is an estimated 4 to 8 weeks, depending on job size.
Every quote shows:
- Your sizes. Room or enclosure dimensions and the panel layout, so you can check our math.
- Line items. Panel size, quantity and unit price, or a single rolled-up total on larger jobs.
- Tax and shipping. Sales tax for your state, and shipping included to your address.
- Terms. Paid in full at order. Lead time starts once payment is received and the layout is confirmed.
- Valid through date. Pricing is held for 30 days.
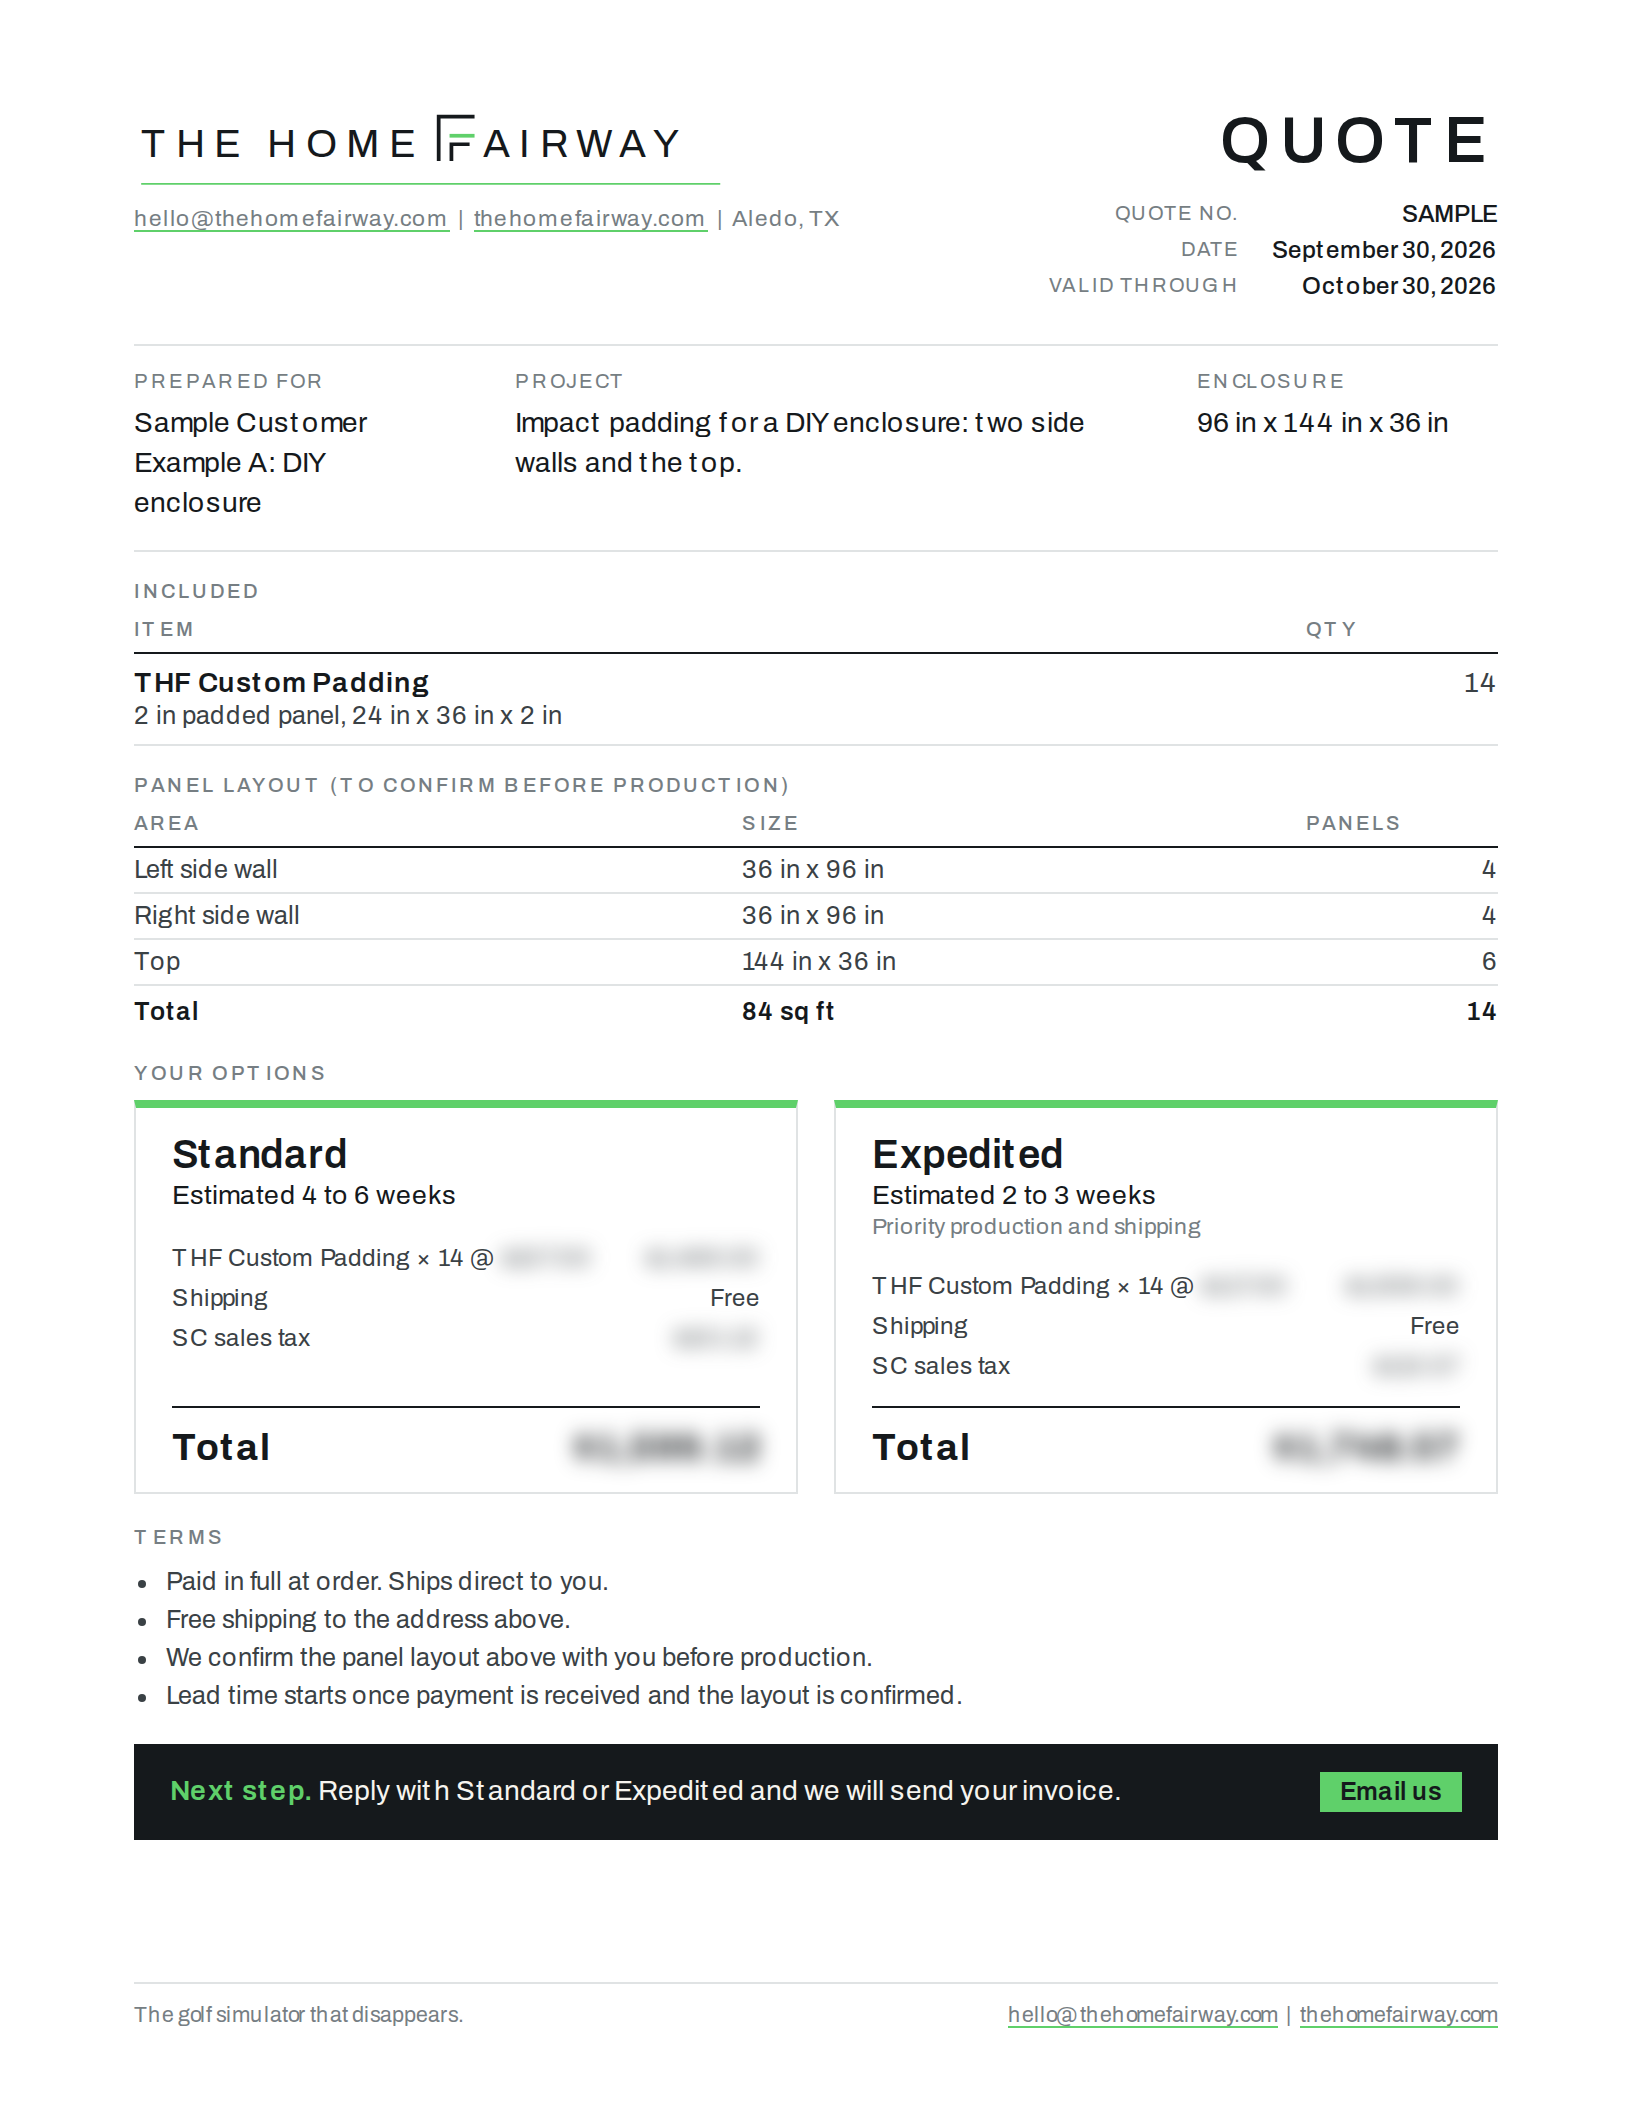
Why roll it up? On a 22-piece job, six lines of panel codes don't help you decide. One total does, with the full schedule on the drawing for anyone who wants detail.
Step 6: Confirm the layout, produce, install
- You approve the quote. Reply to say you want to go ahead and we send an invoice.
- We confirm the layout. Before anything is cut, we walk through the drawing with you one more time. A moved outlet or a different screen offset is a 2-minute fix now and an expensive one later.
- Production starts. The lead time clock starts once payment is in and the layout is confirmed.
- Delivery. Panels ship direct to your address.
- Install. We send install instructions for both hook-and-loop and channel mounting. Use the drawing's letter codes to place each panel.
FAQ
How far back should golf simulator side wall padding go?
We usually run side pads 8 ft (96 in) out from the screen wall. That covers the zone where most mishits land.
Do I need ceiling padding?
Yes, we recommend it in every bay. Flop shots, wedges with a lot of loft and skied drivers all climb fast, and a thin top edge sends the ball straight up. Ceiling pads start just in front of the screen and run back over the hitting area, so those shots hit padding instead of drywall or a light fixture.
What thickness do you use?
Our standard panel is 2 in thick.
Why are panels limited to 66 in?
Larger pieces are harder to ship and handle. Keeping every panel at 66 in or less means fewer seams in the wrong places and an easier install.
Can you pad around outlets, doors and soffits?
Yes. Each one becomes a notch or gap on the drawing, confirmed with you before production.
How long does it take?
An estimated 4 to 8 weeks, depending on job size. Lead time starts once payment is received and the layout is confirmed.
Get your padding quote
Send us your room measurements and a few photos, and we will come back with a dimensioned layout and a quote. Request a custom room quote